As usual insanity is continued 🙂 This tutorial will guide you step by step to create a simple shout box using PHP & Ajax with the hope you can create it for your own. Actually, there are lots of advanced shout boxes spread in internet that you can place in your page freely, but have you ever think how actually to create it? Well, this tutorial will show you the idea behind it!

PHP Shoutbox Interface
Yeah, that will be our final result. Download the source code here.
The first thing we would think is how we place all the required files so that it would be easier to organized. This following picture shows you how I organized my files in the root folder.
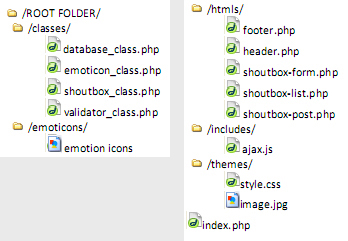
As you can see from the above picture I created five folders in which each of them holds all files with the same category where classes folder is used to hold all our class files later, emoticons folder is used to hold all the emoticons, htmls folder is used to hold all html files, includes folder is used to hold all supporting script like Javascript, Ajax, or JQuery, themes folder will be used to store the templates that include images, css file, and other file. The last file is index.php as the main page that implement all classes and html files. File organizing is very important to be noticed for easy maintenance and development. 🙂
Creating The Classes
Since this shoutbox will be created by OOP way, firstly we’ll create all classes that will be implemented by the main program and separate them by placing them in the classes folder in which the classes should be reusable so whenever we need them we simply create an instance from that classes. Okay, here are the classes:
– database_class.php
Now, inside database_class.php write this code:
defined('__SHOUTBOX__') or exit;

define("SERVER", "localhost");
define("USERNAME", "root");
define("PASSWORD", "");
define("DATABASE", "db_shoutbox");

class MySQL_Driver {

	public function __construct() {
		mysql_connect(SERVER,  USERNAME, PASSWORD);
		mysql_select_db( DATABASE ) or die( "Error: Database " . DATABASE . " is not exists!");
	}

	public function query( $q ) {
		return mysql_query( $q );
	}

	public function fetch_array( $q ) {
		return mysql_fetch_array( $q );
	}

	public function num_rows( $q ) {
		return mysql_num_rows( $q );
	}
}

class PostGRE {
	// write here some codes to execute SQL via PostGRE
}

class Oracle {
	// write here some codes to execute SQL via Oracle
}

// use MySQL
$db = new MySQL_Driver();
?>
The above class is used to connect the application to the server and substitute the MySQL functions. So, we’ll use $object->query instead of mysql_query(), $object->fetch_array() instead of mysql_fetch_array(), and so on. This is useful since when we are going to appropriate the application to other database we don’t need to change SQL functions in every page. Say that we want to move from MySQL to PostGRE, in this case we don’t need to change all MySQL functions to Postgre functions. Example from mysql_query() to be pg_query(), we just need to change the instance of database class.
– emoticon class
Did you see there are two emoticons in the main interface (earlier picture)? Yeah, that was actually handled by this simple class. So, when you express your mood like typing 🙂 or 😦 , it will be automatically replaced by this class by calling replaceText() method. Here is the code:
<?php
defined('__SHOUTBOX__') or exit;

class Smiley {
	var $emoticons;
	var $emoticonPath;

	public function __construct( $newPath ) {
		$this->emoticonPath = $newPath;
		$this->emoticons = array(
			     'sad.gif'        => ':-(',
			     'smile.gif'      => ':-)',
			     'angry.gif'      => ':-D');
			     // add more emoticons here...
	}

	public function replaceText($text) {
		foreach($this->emoticons as $key => $val) {
			$text = ereg_replace($val, "<img src=".$this-%3EemoticonPath.$key.">",$text);
		}
		return $text;
	}
}
– shoutbox_class.php
Now, create a file and name it shoutbox_class.php and write this code:
<?php
defined('__SHOUTBOX__') or exit;

/* The main Interface */
interface Shoutbox_Interface {
	public function __construct( $new_table );
	public function read();
	public function shout( $name, $website, $comment );
	public function edit( $id );
	public function update( $name, $website, $comment, $id );
	public function delete( $id );
}

/** Implement the interface
  * @__ construct( param ): param is the table being used
  **/
class ShoutBox implements Shoutbox_Interface {

	var $shoutbox_id;
	var $name;
	var $website;
	var $comment;
	var $posted;
	var $shoutbox_table;
	var $lists = array();

	public function __construct( $new_table ) {
		$this->shoutbox_table = "";
		$this->posted = date('Y-m-d H:i:s');
		$this->shoutbox_table = $new_table != "" ? $new_table : "";
	}

	/** CRUD (Cread, Read, Update, Delete) interface
	  * They are used to manage the records
	  **/
	public function read() {
		global $db;
		$query = $this->action( 'read' );
		while( $rows = $db->fetch_array( $query ) ) {
			array_push( $this->lists, $rows);
		}
	}

	public function shout( $name, $website, $comment ) {
		$this->name = $name;
		$this->website = $website;
		$this->comment = $comment;

		$this->action( 'save' );
	}

	public function edit( $id ) {
		global $db;
		$this->shoutbox_id = (int) $id;
		$edt = $this->action( 'edit' );
		$this->entry = $db->fetch_array( $edt );
	}

	public function update( $name, $website, $comment, $id ) {
		$this->name = $name;
		$this->website = $website;
		$this->comment = $comment;
		$this->shoutbox_id = (int) $id;
		$this->action( 'update' );
	}

	public function delete( $id ) {
		$this->shoutbox_id = (int) $id;
		$this->action( 'delete' );
		header("location:index.php");
	}

	/** what action?
	  **/
	public function action( $act ) {
		global $db;

		$read = "SELECT * FROM " .  $this->shoutbox_table . " ORDER BY shoutbox_id DESC";

		// untuk menyimpan
		$create = "INSERT INTO " . $this->shoutbox_table . " (shoutbox_id, name, website,
                          comment, posted) VALUES(null, '" . $this->name . "','" . $this->website .
                          "','" . $this->comment . "','" . $this->posted . "')";

		$edit = "SELECT * FROM " .  $this->shoutbox_table . " WHERE shoutbox_id='" .
                        $this->shoutbox_id . "'";

		$update = "UPDATE " .  $this->shoutbox_table . " SET name='" . $this->name .
                          "', website='" . $this->website . "', comment='" . $this->comment .
                          "' WHERE shoutbox_id='" . $this->shoutbox_id . "'";

		$delete = "DELETE FROM " .  $this->shoutbox_table . " WHERE shoutbox_id='" .
                          $this->shoutbox_id . "'";

		switch( $act ) {
			default : null; break;
			case 'save':
				$db->query( $create );
			break;

			case 'read':
				return $db->query( $read );
			break;

			case 'edit':
				return $db->query( $edit );
			break;

			case 'update':
				$db->query( $update );
			break;

			case 'delete':
				$db->query( $delete );
			break;
		}
	}
}
?
As you can see from ShoutBox class, it has an interface which tell us what methods this class has. From the interface we know that this class commonly used to manage the records including CRUD. So, this class can be used repeatedly in the user side and administrator side. You can add more methods inside that class for more specific tasks, for instance displaying the paging, deleting multirecord, and so on.
So, to use that class we simply write the codes like this:
<?php
$shout = new ShoutBox( 'Shoutbox Table' );

// read the records
$shout->read();

// insert a record
$shout->shout( 'Philips', 'http://www.philips.com', 'This is a comment');

// update record with id = 25
$shout->update( 25 );

// delete record with id = 66
$shout->delete( 66 );
<?php
– validator_class.php
Validator class is commonly used to validate the user’s inputs that includes email, website, message, etc. I do that by writing very simple regex, you can add more code inside this class to validate the specific inputs. A good advice said that “never trust the user !”.
defined('__SHOUTBOX__') or exit;
class Validator {
	public function filter($field) {
		return trim(htmlentities($field));
	}
	public function checkEmail($field) {
		$pattern = "^(.+)@(.+).(.+)$";
		return eregi($pattern, $field);
	}
	public function checkWeb($field) {
		$pattern = "^(http://)([a-zA-Z].+).[(com) || (co.id)]";
		return eregi($pattern, $field);
	}
	// add more methods here to validate whatever you want!
}
?>
Creating The Interface
Ok, now that we’ve had all required classes for our shout box. Now we’ll create html files as the “backbone” of shoutbox’s interface and place them in the htmls folder. The intended files are footer, header, and files for displaying and inputting the shouter’s message. Ok, let’s create it!
– header.php
Header is also nothing more than a html code, so simply write this code:
<?php defined('__SHOUTBOX__') or exit; ?>

<!DOCTYPE html PUBLIC "-//W3C//DTD XHTML 1.0 Transitional//EN" "http://www.w3.org/TR/xhtml1/DTD/xhtml1-transitional.dtd">
<html xmlns="http://www.w3.org/1999/xhtml">
<head>
<meta http-equiv="Content-Type" content="text/html; charset=iso-8859-1" />
<link rel="stylesheet" type="text/css" href="themes/style.css" />
<script language="javascript" type="text/javascript" src="includes/ajax.js" /></script>
<title>Simple ShoutBox</title>
</head>

<body onload="show_shoutbox_list(); return false;">
There is a little strange in line 12 where in onload event I wrote show_shoutbox_list(); return false; Wow, what the hell is that? well, that’s a javascript function that tells the browser to show the shouters list automatically when the browser is loaded for first time. Ok, I’ll show you what script inside that function, I promise. 🙂
-footer.php
Footer is the simplest code, yay!
<?php defined('__SHOUTBOX__') or exit; ?>
</body>
</html>
– shoutbox-form.php
Shoutbox-form is also consist of html code which displays the text fields, button, etc…Ok, here it’s..
<?php defined("__SHOUTBOX__") or exit; ?>

<div class="shoutbox-form">
<form name="frmshoutbox" method="post" onsubmit="shout_post(); return false;">

<input type="text" name="txtname" size="20" maxlength="20" value="Name..." onfocus="if(this.value=='Name...'){this.value='';}" onblur="if(this.value==''){this.value='Name...';}" id="inputbox"/>

<input type="text" name="txtwebsite" size="20" maxlength="100" value="http://www." id="inputbox"/><br />

<textarea cols="30" rows="4" name="txtm" onfocus="if(this.value=='Max 150 characters'){this.value='';}" onblur="if(this.value==''){this.value='Max 150 characters';}" id="shout-textarea">Max 150 characters</textarea>

<div id="ajax-result-shoutbox"></div>
<div id="loading-shoutbox"></div>

<input type="submit" value="Shout !" id="button" />
</form>
</div>
The important thing from shoutbox-form is shout_post() function in line 4. This function is used to send the user’s inputs from the browser to the server via Ajax, so the browser will not reload its page. It looks like work behind the scene.
– shoutbox-list.php
Next, we’ll create a page which displays all the shouters to the browser. Since it takes the data from the database, we’ll include database_class.php to connect it to the server. Querying the data from the database is shown by the code in line 08 – line 18 by creating an object from the shoutbox class. It’s clean, right?
<?php
define("__SHOUTBOX__", 1);

require_once( '../classes/database_class.php' );
require_once( '../classes/emoticon_class.php' );
require_once( '../classes/shoutbox_class.php' );

$smile = new Smiley( 'emoticons/' );
$shoutbox = new Shoutbox( 'tb_shoutbox' );

$shoutbox->read();

foreach( $shoutbox->lists as $shouter ) {
$link_website = $shouter['website'] == '' ? $shouter['name'] : "<a href="$shouter[website]" target="_blank">$shouter[name]: </a>";
?>
<div id="sender"></div>
<div id="comment">replaceText( nl2br($shouter['comment']) ); ?></div>
<div id="separator"></div>
} // end foreach
?>
– shoutbox-post.php
This code is used to save the shouter’s message to the database, but before it’s sent to the server, “validator class” will validate it first to make sure the shouter inputs the valid data.
<?php
define("__SHOUTBOX__", 1);

require_once( "../classes/database_class.php");
require_once( "../classes/shoutbox_class.php");
require_once( "../classes/validator_class.php");

$validate = new Validator();
$shout  = new Shoutbox( 'tb_shoutbox' );

$name    = $validate->filter( $_GET["name"] );
$website = $validate->filter( $_GET["website"] );
$message = $validate->filter( $_GET["message"] );

sleep(1);

$error = false;

if( $name == '' || $name == 'Name...' || $message == '' ||
         $message == 'Max 150 characters') {
	$error .= '- Opss, you don't type anything!';
}

if( !$validate->checkWeb($website) ) {
	$error .= '- Website isn't valid';
}

if( strlen($message) > 150 ) {
	$error .= '- Message => max 150 characters';
}

if( $error != '' ) {
	echo "<font color="red">" . $error . "</font>";

} else {
	$shout->shout( $name, $website, $message );
	echo "<font color="green">Thank You!</font>";
}
?>
Ok, that’s all about the interface, now create a javascript file and inside it write this Ajax script, don’t forget to save it in the includes folder as I’ve shown in the earlier picture.
var xmlhttp;
var xmlhttp1;

function creatingObject() {

   var ajaxRequest;

   try {
	ajaxRequest = new XMLHttpRequest();

   } catch (e){
	try{
	   ajaxRequest = new ActiveXObject("Msxml2.XMLHTTP");
	} catch (e) {
	   try{
              ajaxRequest = new ActiveXObject("Microsoft.XMLHTTP");
	   } catch (e){
              alert("Application terminate, your browser does not support Ajax");
	      return false;
	   }
	}

    }
   return ajaxRequest;
}

/** show the list in the real time
  **/
function show_shoutbox_list() {
    xmlhttp1 = creatingObject();
    xmlhttp1.onreadystatechange = function(){
      if(xmlhttp1.readyState == 4){
         document.getElementById("shoutbox-list").innerHTML = xmlhttp1.responseText;
      }
    }
    xmlhttp1.open("GET", "htmls/shoutbox-list.php?sid="+Math.random(), true);
    xmlhttp1.send(null);
}

// shout!
// shout!
function shout_post() {
    xmlhttp = creatingObject();

    var name    = encodeURI(document.frmshoutbox.txtname.value);
    var website = encodeURI(document.frmshoutbox.txtwebsite.value);
    var message = encodeURI(document.frmshoutbox.txtm.value);

    var url = "htmls/shoutbox-post.php?name=" + name + "&website=" + website +
              "&message=" + message + "&sid=" + Math.random();

    document.getElementById("loading-shoutbox").style.visibility = 'visible';
    document.getElementById("loading-shoutbox").innerHTML = "<img src="%3Cbr">    themes/loading.gif alt=loading align=left> Loading...";

    xmlhttp.onreadystatechange = function() {
    if(xmlhttp.readyState == 4)	{
	document.getElementById("loading-shoutbox").style.visibility = 'hidden';
	document.getElementById("loading-shoutbox").innerHTML = '';
	document.getElementById("ajax-result-shoutbox").innerHTML = xmlhttp.responseText;
	document.frmshoutbox.txtm.value = 'Max 150 characters';
	show_shoutbox_list();
	}
    }
    xmlhttp.open("GET", url, true);
    xmlhttp.send(null);
}
creatingObect() function from the above Ajax script is used to make sure it works for Internet Explore and Mozilla Firefox. I’ve been tested it, and the result is, it works well for that browsers. Hmm….. here is my promise…….. show_shoutbox_list() function is used to display the shouter’s message to the browser in real time, which means when the shouter submitting the data, the server will display it back to the user immediately without having to reload the page whereas shoutBox() function is the Ajax core which sends the user’s data via “behind the scene”. 🙂 Ok that’s all…..
To make the interface slight cool, write this css script in your style.css and don’t forget to place it in the themes folder as I’ve shown in the earlier picture..
body {
	font-family:"Trebuchet MS";
	font-size:11px;
}
h3 {
	margin:0px;
	padding:0px;
	font-family:"Trebuchet MS";
	color:#0099CC;
}
#shoutbox-list{
	background-color:#F3F3F3;
	border:solid 1px #CCCCCC;
	padding:5px;
	height:100px;
	width:280px;
	overflow:auto;
	font-size:10px;
	margin-bottom:10px;
}
	#shoutbox-list #sender a{
		color:#0099CC;
		font-style:italic;
	}
	#shoutbox-list #comment {
		margin-top:0px;
	}
	#shoutbox-list #separator {
		margin-top:5px;
		border-bottom:solid 1px #CCCCCC;
	}

.shoutbox-form {
}

	.shoutbox-form #inputbox{
		color:#666666;
		border:solid 1px #CCCCCC;
		width:136px;
		font-family:Arial, Helvetica, sans-serif;
		font-size:11px;
		padding:3px;
		margin-top:5px;
	}

	.shoutbox-form #shout-textarea{
		padding:5px;
		border:solid 1px #CCCCCC;
		color:#666666;
		width:280px;
		height:50px;
		font-family:Arial, Helvetica, sans-serif;
		font-size:11px;
	}

	.shoutbox-form #button{
		background-color:#FCFCFC;
		color:#666666;
		border:solid 1px #CCCCCC;
		padding:2px;
		-webkit-border-radius:5px;
		-moz-border-radius:5px;
		font-family:"Trebuchet MS";
	}

.shoutbox-form img {
		border:0px;
	}

#loading-shoutbox {
	visibility:hidden;
	margin-bottom:5px;
	color:#666666;
}
Ok, I think nothing strange on the above css script. And the last file is index.php, write this code inside it and place it in the Root Folder. Here is the code.
<?php
define('__SHOUTBOX__', 1);

require_once( 'htmls/header.php' );
?>

<h3>Simple ShoutBox</h3>
<div id="shoutbox-list"></div>

/* simple & clean */
require_once( 'htmls/shoutbox-form.php' );
require_once( 'htmls/footer.php' );
?>
Ok, that’s all about creating a simple shoutbox. Now that, you’ve had your own shoutbox and you can place it in your website, hehehe…What do think ? 🙂

#1 by Miles Digby on December 22, 2018 - 8:53 am
I loved as much as you’ll receive carried out right here. The sketch is attractive, your authored material stylish. nonetheless, you command get got an shakiness over that you wish be delivering the following. unwell unquestionably come more formerly again since exactly the same nearly a lot often inside case you shield this hike.